
Tutorial: Building a 3D Volume Rendering App with 2D Transfer Functions Using VTK, PyQt5 & Matplotlib
This tutorial walks through how to build an interactive 2D transfer function editor with volume rendering, using:
VTK for 3D visualization and volume rendering
PyQt5 for the GUI
Matplotlib for 2D histogram interaction
SimpleITK for medical image processing
NumPy for numerical computations

What You Get
A live application where:
- The 3D volume updates instantly as you manipulate ROIs in the 2D histogram
- ROIs are mapped to specific tissue structures using color & transparency
- You can control segmentation overlays using 3D STL meshes
Learning Outcomes
- How to bridge SimpleITK ↔ VTK ↔ Matplotlib ↔ Qt
- How to implement interactive 2D transfer functions
- How to combine UI with volume rendering for medical imaging
Project Overview
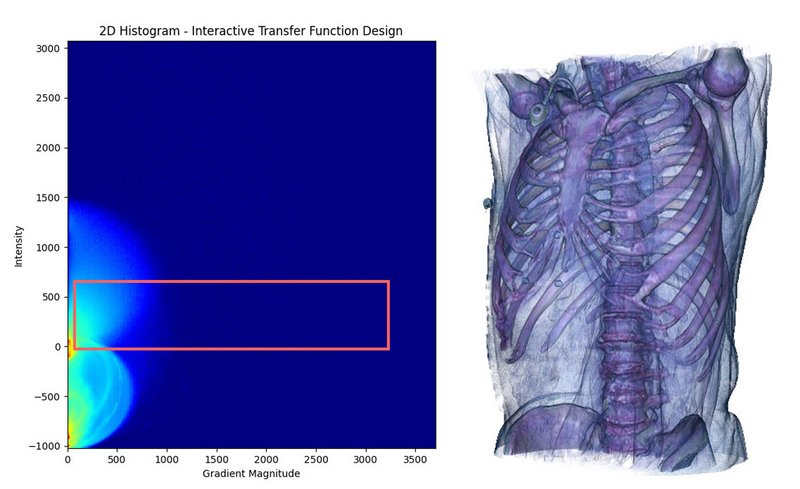
This is a comprehensive tutorial and functional application for learning and using 2D transfer functions in medical volume rendering. The application demonstrates advanced visualization techniques used in medical imaging and scientific visualization.
2D transfer functions provide superior control over volume rendering compared to traditional 1D transfer functions by considering both intensity and gradient magnitude. This allows for better tissue differentiation and more intuitive volume design.
The application loads a medical NIfTI volume (e.g. a CT scan), computes a 2D histogram (intensity vs. gradient magnitude), lets the user draw interactive ROIs as transfer functions, and visualizes the volume with GPU-based 2D transfer function volume rendering in real-time.
Key Concepts
- Volume Rendering:
GPU-accelerated ray casting for real-time visualization - 2D Transfer Functions:
Using intensity-gradient histograms for design - Interactive Design:
Mouse-driven ROI manipulation and parameter adjustment - Medical Image Processing:
Loading, orienting, and processing medical data - 3D Mesh Overlays:
Segmentation mask visualization with opacity controls
Prerequisites
pip install PyQt5 vtk matplotlib numpy SimpleITKApplication Structure
The application is organized into several modules:
main_application.py: Main window and application logic
utils/: Core utilities for image processing, VTK rendering, and file I/O
widgets/: Custom Qt widgets for interactive components
nifti2stl.py: External module for mesh generation from segmentation masks
For the tutorial experience, download the full code and use main_application.py directly or the convenience function in init.py
Tutorial usage:
1. Run main_application.py
2. Or use the convenience function: from . import run_tutorial; run_tutorial()
1. Entry point
def main():
app = QApplication(sys.argv)
volume_file = "abdomen.nii"
mask_config = {}
roi_config_file = ""
main_window = TransferFunction2DMainWindow(
volume_file_path=volume_file,
mask_config=mask_config,
roi_config_file=roi_config_file
)
main_window.show()
sys.exit(app.exec_())
if __name__ == "__main__":
main()
2. Volume loading
def load_medical_image(file_path: str, target_orientation: str = "LPS") -> sitk.Image:
image = sitk.ReadImage(file_path)
oriented_image = sitk.DICOMOrient(image, desiredCoordinateOrientation=target_orientation)
oriented_image.SetDirection([
1.0, 0.0, 0.0,
0.0, 1.0, 0.0,
0.0, 0.0, 1.0
])
oriented_image.SetOrigin([0.0, 0.0, 0.0])
return oriented_image
This function loads medical images (typically NIfTI format) and ensures consistent orientation and coordinate system for processing and visualization.
3. 2D histogram computation
def compute_2d_histogram(volume_data, bins_intensity=512, bins_gradient=256):
intensities = vtk_to_numpy(volume_data.GetPointData().GetScalars())
gradient_filter = vtk.vtkImageGradientMagnitude()
gradient_filter.SetInputData(volume_data)
gradient_filter.Update()
gradient_data = vtk_to_numpy(
gradient_filter.GetOutput().GetPointData().GetScalars()
)
histogram, intensity_edges, gradient_edges = np.histogram2d(
intensities, gradient_data, bins=(bins_intensity, bins_gradient)
)
return histogram, intensity_edges, gradient_edges
This builds the 2D histogram of intensity vs gradient magnitude for transfer function design.
This histogram is the foundation of 2D transfer functions, which provide more control over volume rendering than traditional 1D transfer functions by considering both intensity and gradient information.
4. Interactive histogram editor (Matplotlib)
The InteractiveTransferFunctionCanvas class:
- Visualize 2D intensity-gradient histograms
- Create and manipulate rectangular ROIs
- Adjust ROI properties (color, opacity, window levels)
Mouse interaction methods:
on_mouse_press
on_mouse_move
on_mouse_release
All update the 2D transfer function in real-time.
5. Volume Rendering Setup (VTK)
The class VolumeRenderer manages VTK volume rendering with 2D transfer functions. First initialize the volume renderer with:
volume_data (vtk.vtkImageData): The volume to render
bins_intensity (int): Resolution for intensity axis of transfer function
bins_gradient (int): Resolution for gradient axis of transfer function
class VolumeRenderer:
def __init__(self, volume_data, bins_intensity=1024, bins_gradient=512):
self.volume_data = volume_data
self.bins_intensity = bins_intensity
self.bins_gradient = bins_gradient
self.mapper = None
self.volume_property = None
self.volume = None
self.transfer_function_texture = None
self._setup_volume_rendering()
Configure VTK components for GPU-accelerated volume rendering.
def _setup_volume_rendering sets up:
- GPU ray casting mapper for performance
- Volume properties for lighting and shading
- 2D transfer function texture
def _setup_volume_rendering(self):
# Create GPU-accelerated volume mapper
self.mapper = vtk.vtkGPUVolumeRayCastMapper()
self.mapper.SetInputData(self.volume_data)
self.mapper.SetUseJittering(1) # Reduce aliasing artifacts
# Initialize 2D transfer function texture
self._create_transfer_function_texture()
# Configure volume properties
self.volume_property = vtk.vtkVolumeProperty()
self.volume_property.SetInterpolationTypeToLinear()
self.volume_property.ShadeOn() # Enable lighting
# Set lighting parameters for realistic appearance
self.volume_property.SetAmbient(0.4)
self.volume_property.SetDiffuse(0.6)
self.volume_property.SetSpecular(0.3)
self.volume_property.SetSpecularPower(10.0)
# Use 2D transfer function mode
self.volume_property.SetTransferFunctionMode(
vtk.vtkVolumeProperty.TF_2D
)
self.volume_property.SetTransferFunction2D(self.transfer_function_texture)
# Create the volume actor
self.volume = vtk.vtkVolume()
self.volume.SetMapper(self.mapper)
self.volume.SetProperty(self.volume_property)
6. Updating the Transfer Function
Create an empty 2D transfer function texture. The texture is a 2D image where:
- X-axis represents gradient magnitude
- Y-axis represents intensity
- RGBA values define color and opacity at each point
def _create_transfer_function_texture(self):
self.transfer_function_texture = vtk.vtkImageData()
self.transfer_function_texture.SetDimensions(
self.bins_intensity, self.bins_gradient, 1
)
self.transfer_function_texture.AllocateScalars(vtk.VTK_FLOAT, 4)
scalars = self.transfer_function_texture.GetPointData().GetScalars()
for i in range(scalars.GetNumberOfTuples()):
scalars.SetTuple4(i, 0, 0, 0, 0) # RGBA = (0,0,0,0)
Update the 2D transfer function based on region of interest definitions. Clear existing transfer function and apply each ROI to the transfer function.
def update_transfer_function(self, roi_list, extent_intensity, extent_gradient):
scalars = self.transfer_function_texture.GetPointData().GetScalars()
for i in range(scalars.GetNumberOfTuples()):
scalars.SetTuple4(i, 0, 0, 0, 0)
for roi in roi_list:
self._apply_roi_to_transfer_function(
roi, extent_intensity, extent_gradient
)
self.transfer_function_texture.Modified()
UI Features
- Add/Remove ROI rectangles
- Select colormap (e.g. coolwarm, viridis )
- Save & Load ROI configurations ( .json )
- Mask Controls: Adjust 3D overlay opacity (if masks are loaded)
The full working code is in 2DTransferFunctionApp.zip [100 MB]
Marcus

Dr.-Ing. Marcus Prümmer
Am Weichselgarten 7
91058 Erlangen
Germany
+49 (0)9131 - 691 385
+49 (0)9131 - 691 386
pruemmer(at)chimaera.de